−Table of Contents
Quick Start Guide to Vital Signs Monitoring
Setup: cosinuss° Health platform
You received the c-med° alpha or the cosinuss° Two in-ear wearable sensor together with the Gateway. Vital sign data can now be monitored and visualized through the cosinuss° Health Platform.
For a first test of the Remote Vital Signs Monitoring (RVSM) system, please follow the steps below.
Please note that additional information for the full usage and functionality of the system is available here for cosinuss° Two & Gateway, cosinuss c-med° alpha & Gateway and cosinuss° Health Platform .
1. Set up the Gateway
- Plug the Gateway into a power supply and the red power LED on the Gateway will turn on.
- In addition, the Gateway needs to be connected to the Internet. In total, there are three different options (Wi-Fi, LAN or internet-stick) to connect the Gateway to the Internet.
Using the Gateway with an Internet stick:
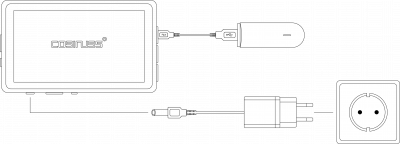
- In most cases, the Gateway is used with the Internet stick. This generally enables an uncomplicated Internet connection and portable use of the system.
- Please be aware that using the internet stick will incur costs for mobile data consumption.
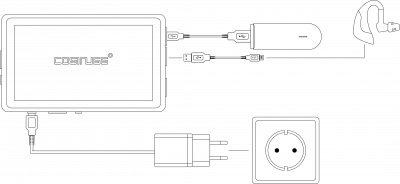
- The following diagram shows how the Internet stick is connected to the Gateway.
- If a SIM card is inserted, it will be activated as soon as you connect the Gateway with a power source. The internet stick will then flash for about 1-2 minutes until it is ready for use. If it still does not work, make sure the Gateway is correctly connected with the internet stick.
- Please do not try to remove the SIM-stick, it is fixed on the Gateway.
Using the Gateway with LAN or Wi-Fi:
- Alternatively, the Gateway can also be connected to the Internet via LAN or Wi-Fi. Especially for a long-term use of the system and a more stable data transmission, an internet connection with LAN or Wi-Fi could be advantageous. You can find more information for the connection with LAN here and Wi-Fi here.
Note: The type of Internet connection of the Gateway depends heavily on the respective use case and should be selected accordingly.
2. Charge the cosinuss° in-ear sensor
For all sensors applies:
- Our in-ear sensors are already partially charged when delivered and should be equipped with enough battery power for a quick product test. In some cases, the battery of the sensor may be no longer charged and needs to be recharged before use.
- For prolonged use of the device and to ensure maximum battery performance, the device should be fully charged. Charging time for full battery capacity is approx. 1 hour.
- Ideally, the cosinuss° sensors should be recharged at least twice a year, otherwise battery damage could occur.
For the c-med° alpha:
- Place the sensor bottom first into the charging box and connect it with a power supply.
- Afterwards, the charging box can be unplugged and the c-med° alpha should stay in the box as long as it is not used.


For the cosinuss° Two:
- Use the cable included in the package of the cosinuss° Two and connect the sensor with the Gateway for charging.
- The status LED light of the °Two on the bottom is red when charging.
- The red light will turn off when the battery is fully charged.
- Afterwards, the sensor can be unplugged.

3. Turn on the sensor
For the c-med° alpha:
- As soon as you take the c-med° alpha out of the charging box, the sensor will switch on and try to connect with a Gateway.
- If a connection to a Gateway is established, the c-med° alpha will be instructed by the Gateway when and how long to measure and when to be in battery-saving sleep mode.
- The c-med° alpha can be switched off by putting it back into the charging box.
For the cosinuss° Two:
- In the preset mode, the cosinuss° Two is always switched on and trying to connect to a Gateway. The status LED blinks blue once every three seconds. If a connection to a Gateway is established, the cosinuss° Two will be instructed by the Gateway when and how long to measure and when to be in battery-saving sleep mode.
- Before use, the sensor should be charged.
- In this default mode, there is no possibility to switch the sensor off.
4. Insert the sensor inside the ear canal
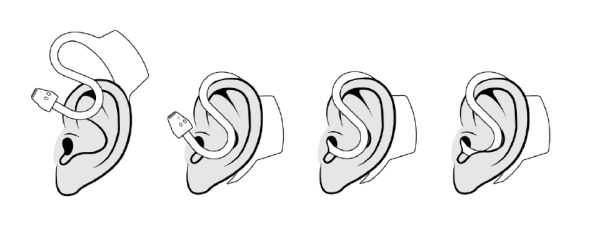
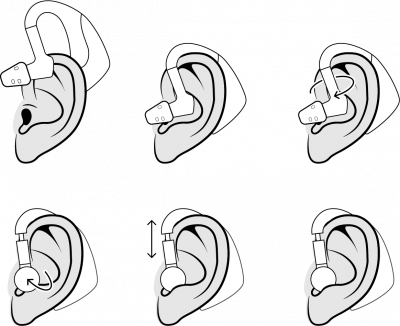
It is crucial to ensure a firm and comfortable fit of the sensor in the ear so that the most accurate values can be measured.
The sensor needs to be inside the ear to start a measurement!
Step-by-step application of the cosinuss c-med° alpha:

You can find more information about how to insert the c-med° alpha and what the LED indicators mean here.
Step-by-step application of the cosinuss° Two:
 You can find more information about how to insert the cosinuss° Two and what the LED indicators mean here.
5. Registering devices and creating users
In order to record data, you need to add at least one receiving device (the Gateway) and one sensor device (cosinuss° Two or c-med° alpha). In addition, a user account needs to be assigned to a cosinuss° sensor and the Gateway. Usually, we have already registered all your devices and created the corresponding user accounts.
If you want to adjust this assignment retrospectively, please refer to the following bullet points for more information.
More information about the installation of updates can be found here.
6. Overview of the displayed vital signs and data analysis
A sensor inserted into the ear canal, turned on, connected to a receiver and assigned to a user, automatically starts measuring and transmitting data. Select 'DASH' on the menu bar to get the vital sign data displayed in the web interface.
- The vital signs data is available for each pseudonym (so for each registered person). By default, you see the mean value of the last three minutes measurement. Due to the currently used configuration of the cosinuss server, it might take up to a few minutes until values will be visible on the Dash. A detailed explanation of display options and further settings of the data view is available here.
- Clicking on the user tile opens the sidebar, here the currently measured data is displayed and trends of the parameters are shown. More information about this form of data visualization is available here.
- Further information about whether the received data has been affected by distortion and which data set characteristics indicate an adequate data validity is available here.
Starting measurements manually
Besides the automatic measurement, there is also the possibility to start a measurement manually.
- Click on a user tile in the DASH view and the sidebar will open. Here, you can press the play button to start a measurement. To stop the measurement, click on the Stop symbol.
- Alternatively, you can click on the data graphs displayed in the sidebar to enter the detailed data view and start a manual measurement by clicking on the button 'TRIGGER RECORD'. A white input field appears that allows you to set the measurement duration. After you entered your input and clicking on TRIGGER IT the measurement starts and continues for as long as the duration was set. Data is uploaded to the server after the measurement stopped. The trigger command is cancelled after 15 min if the Gateway has not been reached. Also, the trigger can be set via the API.


