Table of Contents
c-med° alpha with the Gateway
Remote vital signs monitoring using the c-med° alpha and the Gateway.
Model numbers: c-med° alpha: MS01 Gateway: LG01
Manufacturer information
This product is manufactured by Cosinuss GmbH, Kistlerhofstraße 60, D-81379 Munich https://www.cosinuss.com
Warnings
- Please read the instructions carefully before the first use. This will help you to use the product correctly.
- The c-med° alpha is intended for home use. Please follow the enclosed information and warnings.
- If you feel a deterioration in your general condition, such as breathing difficulties or shortness of breath, contact your doctor or physician.
Disclaimer
For health questions and medical advice, please always consult your doctor. Cosinuss GmbH does not issue any medical recommendations. Cosinuss GmbH is not liable for any abusive or unauthorized use of the product. Cosinuss GmbH is not liable for the loss or misuse of personal data or the product. There are no replaceable parts in the device. Supplied components must not be exchanged. The components must never be exchanged, or the device manipulated without the consent of Cosinuss GmbH.
Signs and Symbols
View the list of signs and symbols used within the labeling and packaging context of the cosinuss° Health Platform and its in-ear sensors:
Labeling

Please note, the first prototype version of the c-med used a different label, more information about this prior label version can be found here.
Unique Device Identification (UDI)

| Part number | Identifier | Length | Description |
|---|---|---|---|
| GTIN (country prefix, manufacturer number, article number, check digit) | (1) | 13+1 | Contains information regarding the product and manufacture (+country) to identify the product worldwide |
| Manufacturing Date | (11) | 6 | Format: yymmdd |
| Type | (10) | 4 | Model of sensor device (e.g.: MS01) |
| LOT | (10) | 4 | Identification to track production batch |
| Serial number | (21) | 6 | Unique serial number |
Product description
c-med° alpha
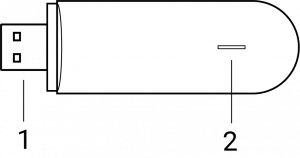
![degree_illustration_gebrauchsanleitung_1 [Wiederhergestellt]](/_media/public/cmed_illustration_xxxx_v01_cmed-pi-sensor.jpg?w=600&tok=d38c4c "degree_illustration_gebrauchsanleitung_1 [Wiederhergestellt]")
| Number | Definition |
|---|---|
| 1 | Adjustable sensor neck |
| 2 | Red/Infrared LED |
| 3 | Contact thermometer |
| 4 | Infrared thermometer |
| 5 | Photodiode |
| 6 | Antitragus curve |
| 7 | Pickaxe |
| 8 | Status LED |
| 9 | Circuit board and battery |
| 10 | Charging LED |
| 11 | Charging contacts |
c-med° alpha accessory
1 x USB charging cable
Gateway

| Number | Definition |
|---|---|
| 1 | Micro SD-Card Slot |
| 2 | Power LED |
| 3 | Power supply socket |
| 4 | Status LED |
| 5 | HDMI Socket |
| 6 | AUX Socket |
| 7 | Ethernet Socket |
| 8 | USB Sockets |
| (9) bottom | Labeling |
Gateway accessory
1 x Power supply, 1 x Modem Stick
Modem Stick
| Number | Definition |
|---|---|
| 1 | USB Connector |
| 2 | Status LED |
Application
1. Set up the Gateway
- Plug the Gateway into a power supply and the red power LED on the Gateway will turn on.
- In addition, the Gateway needs to be connected to the Internet. In total, there are three different options (Wi-Fi, LAN or internet-stick) to connect the gateway to the Internet. The type of internet connection of the Gateway dependents highly on the individual use case.
1.1. Using the Gateway with an Internet stick
- In most cases, the Gateway is used with the Internet stick. This generally enables an uncomplicated Internet connection and portable use of the system.
- Please be aware that using the internet stick will incur costs for mobile data consumption. This fixed amount has already been communicated to you in advance.
 This diagram shows how the Internet stick is connected to the Gateway:
- Make sure the modem stick is correctly connected with the Gateway.
- Plug the cable of the power supply into the charging socket of the Gateway.
- Plug the charging adapter of the power supply into a power outlet socket.
 Do not try to remove the SIM stick, as it is fixed on the Gateway device.
The SIM cards are activated automatically as soon as you connect the Gateway with a power source. The SIM stick will then flash for about 1–2 minutes until it is activated and ready for use.
1.2. Using the Gateway with a LAN connection
- Plug out the Gateway from the power supply.
- Plug out the USB cable between the SIM stick and the Gateway.
- Plug in the LAN cable.
- Plug in the Gateway to the power supply.
Now, the Gateway will use the LAN connection to connect to the internet.
If a connection is not possible, make sure that your network permits the connection with external devices. If you need to register the MAC address of the Gateway, you find the MAC address in your cosinuss° Health account by going to the tab 'RECEIVERS' and clicking on the serial of the Gateway that you use. In the list of attributes that appears, you will find the value for the MAC address. In a clinical setting, it can occur that a connection with a LAN cable is not possible due to security settings and thus no Internet connection can be established for the Gateway. In these cases, use an Internet connection via an Internet stick or WLAN.
1.3. Using the Gateway with a Wi-Fi connection
How to connect the gateway to Wi-Fi is described in more detail here.
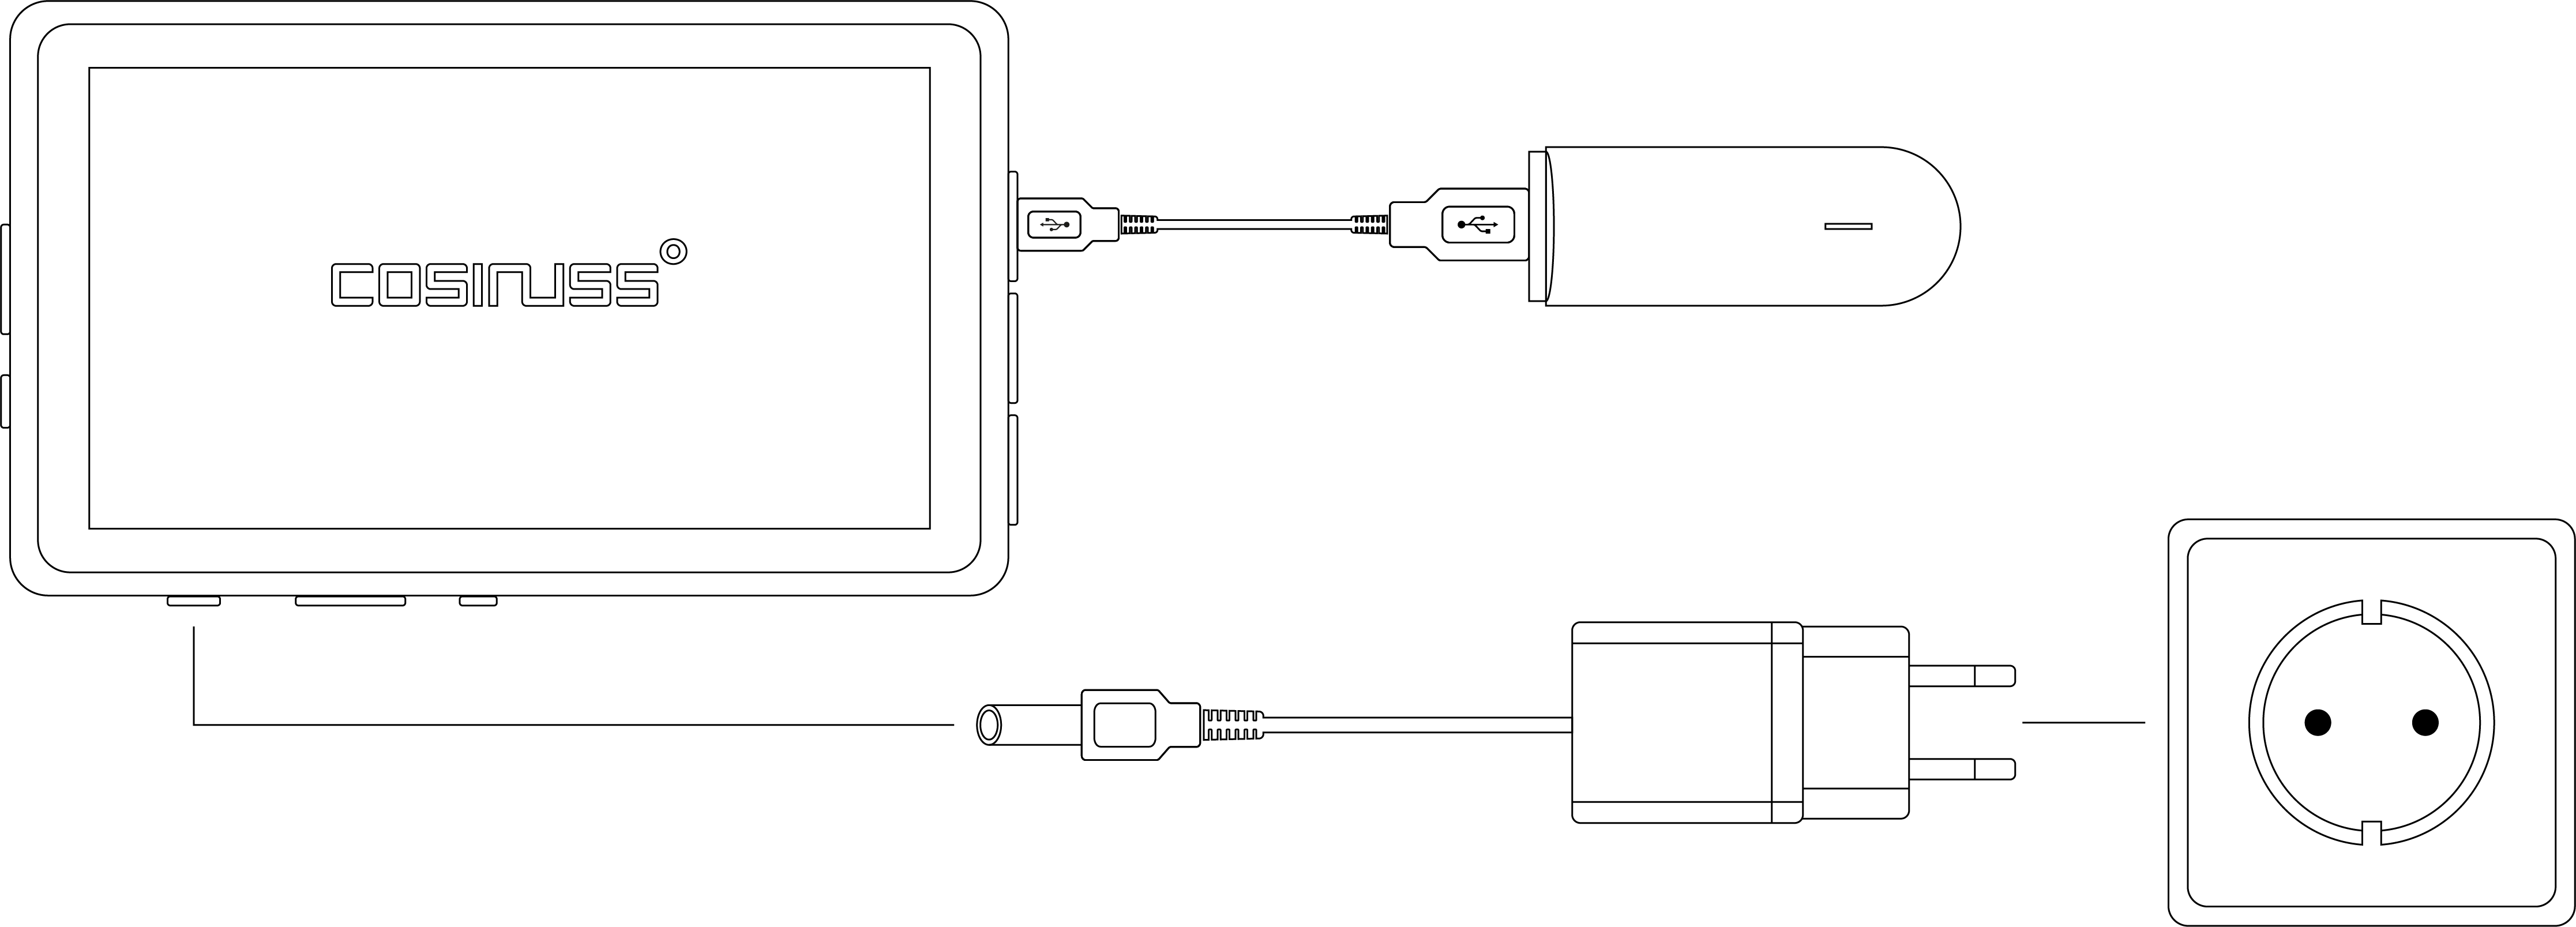
2. Charge the c-med° alpha
Our in-ear sensors are already partially charged when delivered and should be equipped with enough battery power for a quick product test. In some cases, the battery of the sensor may be no longer charged and needs to be recharged before use. For prolonged use of the device and to ensure maximum battery performance, the device should be fully charged.
Charging the c-med° alpha:
- Plug the charging cable into the USB socket of the charging box.
- Plug the other end of the charging cable into the power supply of the c-med° alpha sensor.
- Plug the power supply into a power outlet socket.
The charging LED light of the c-med° alpha lights up red when the sensor has been inserted into the charging case. Charging time for full battery capacity is approx. 1 hour. The red light will turn off when the battery is fully charged. Afterward, the sensor can be unplugged.

When you place the sensor back into the charger box, first push the bottom of the sensor under the small overhead part of the charger box and only then push the entire device into the charger box. This notice is additionally attached to the charging box of the c-med° alpha. You can find this instructional label displayed here below.

3. Turn on the c-med° alpha
- As soon as you take the c-med° alpha out of the charging box, the sensor will switch on and try to connect with a Gateway.
- If a connection to a Gateway is established, the c-med° alpha will be instructed by the Gateway when and how long to measure and when to be in battery-saving sleep mode.
- The c-med° alpha can be switched off by putting it back into the charging box.
To conserve power, advertising will occur periodically every 60 seconds in short intervals of 10 seconds. When the blue LED is blinking rapidly, the c-med° alpha is advertising. If no LEDs are flashing, the sensor is off and may need to be recharged.
4. Insert the c-med° alpha inside the ear canal
It is crucial to ensure a firm and comfortable fit of the sensor in the ear so that the most accurate values can be measured. The sensor needs to be inside the ear to start a measurement!
Step-by-step application of the cosinuss c-med° alpha:
- Apply the c-med° alpha, preferably to the users' right ear.
- Guide the rear part of the c-med° alpha behind the auricle.
- Leave the in-ear sensor gently hanging on top of your ear.
- Carefully guide the in-ear sensor head into the entrance of the outer ear canal.
- Adapt the neck of the in-ear sensor to the shape of the ear.
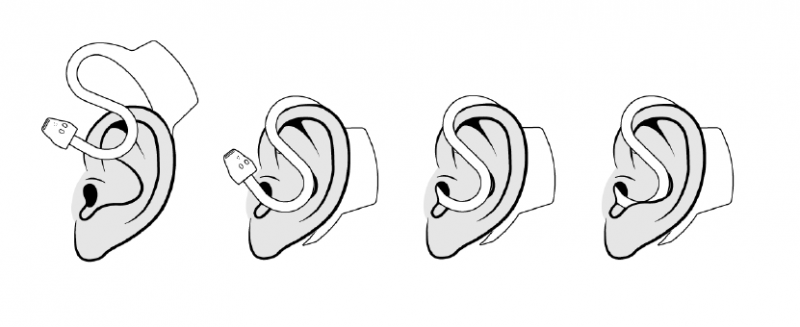
When the c-med° alpha is measuring, the red LED on the ear-plug is on and the blue status LED is flashing at short intervals. In addition, the status LED of the Gateway is flashing green, if the data from the sensor is received.
5. Mode setting
As soon as you take the c-med° alpha from the charging box, the device will boot up and begin advertising. How the sensor can be paired with other devices using Bluetooth is predetermined by the selected mode.
The c-med° alpha can be used in two different settings:
5.1. Standard Mode
- In this default setting, the c-med° alpha can be paired with a smartphone via Bluetooth.
- Through the c-med° app, vital signs data can be displayed on your smartphone.
- Further information about the Standard Setting is available here.
- Once the sensor is connected to a Gateway and has been set to Automatic Mode, the sensor must first be set back to Standard Mode before the sensor can be paired with a mobile phone again. How to switch between the different modes is explained in detail here.
5.2. Automatic Mode
- This mode is used to display the vital signs data on a computer via the web interface of the cosinuss° Health Platform. Herefor the Gateway and the c-med° alpha get paired, and the measured data will be sent to the cosinuss° Health Platform in order to record and display the measured data. Only in this mode can the sensor be used in conjunction with the Gateway.
- The sensor automatically switches to this mode when the sensor is removed from the charging case with a sufficiently charged battery and the Gateway that is connected to the sensor in the cosinuss° Health Platform has an active Internet connection as well as power supply. Then both devices connect automatically.
- Bluetooth Behavior: When in Automatic Mode, the c-med° alpha sends data through custom Bluetooth services. Proprietary commands are used to communicate and send data to the Gateway, which on the other hand communicates and transmits data to the cosinuss° Health Platform. Using custom Bluetooth services enables additional functionalities like e.g., the transmission of raw data, acceleration data, and other features.
6. Create and edit a person
In order to record data, you need to add at least one receiving device (the Gateway) and one sensor device (c-med° alpha). In addition, a user account needs to be assigned to a cosinuss° sensor and the Gateway. If you want to adjust this assignment, please refer to the following bullet points for more information. In some cases, we have already registered all your devices and created the corresponding user accounts. In all cases, however, make sure that users have already been created and that the corresponding devices have also been assigned to them.
6.1. Log in to the platform
- Enter the following URL into your browser: https://health.cosinuss.com/ and log in with your username and password (cosinuss° provides it).
6.2. Create a person:
A subject needs to be assigned to a Gateway and a c-med° alpha sensor. Moreover, a project needs to be connected with a subject. Therefore, please follow the instructions below:

- Select PEOPLE in the menu bar.
- Choose the correct project and then Click on CREATE NEW to create a new person.
- After this, an automatically generated pseudonym has been created and assigned to the person.
- An input field will then open, and person settings can now be entered.
- Active: Activate or deactivate whether data can be recorded for this user. By default, the newly created person is set in the active setting, ready to start measurements at any time. This can be changed at any moment. This can be changed at any moment.
- Add Devices/Receivers: New sensors and Gateways can be added to a pseudonym. Please ensure that prior assignments have been removed. This registration process is described in more detail in the next explanation step.
- Label: This optional labeling feature can be used to add further descriptions to the pseudonym in order to help to distinguish persons from each other, as subjects are only displayed with their newly created pseudonym. This option is disabled by default and would be displayed in this menu when activated. How to enable this feature is explained here.
- Release: To delete the Gateway or sensor assignment of a pseudonym, select 'RELEASE' in the sensor or Gateway info, which becomes visible when you scroll further down in the person detailed view. Make sure to release a sensor or the Gateway before pairing it with a new user.
- Data Chunk: This feature is also available in the device info and allows for a comprehensive data overview of the just collected data.
- Observations and person events: Information on possible observations or personal events can be entered here if this has been intended or set for their project. Please confirm and save your selection by clicking 'Add' for each of the available options. The data that may be entered can be adjusted in the project settings.
6.3. Edit a person:
In some cases, it might be necessary to reallocate sensors and Gateway or change subject information retrospectively. For example, if a different sensor size is needed or a subject is no longer part of a study. For this, select PEOPLE in the menu bar and click on the pseudonym, which is displayed in blue font and also known as the hash ID of the person. Then you enter the person detailed view. Here, more details about one person are listed, and subsequent adjustments can be made. This is the same dialog box that opens automatically after a new person is created, so all the settings described above can also be edited retrospectively. Additional information about this can be found here.
The available and displayed setting options depend on what user rights a user possesses. You can find an overview of the different user rights here and how to set up a project.
6.3. Further setting and display options:
After selecting PEOPLE in the menu bar, the following options appear when you hover over the row of one particular user.

- RELEASE ALL: Release all sensors and Gateways assigned to a pseudonym.
- PDF: Generate a summarizing PDF label for the selected person.
- DATA: View the data calendar view for the selected person.
Further information about these edit settings is provided here.
For more information about the CSV data download, click here.
7. Register on the cosinuss° Health Platform
- The c-med° alpha and Gateway needs to be registered before measurements can be generated.
- Usually test devices are pre-registered for you; however, you still need to make sure that both the sensor and the Gateway are assigned to a person. If the registration and the assignment is already completed, you can skip this step. If not, please follow the steps below, as measurements are only possible with registered and assigned sensors and Gateways. In some cases, it might be necessary to reallocate sensors and Gateways retrospectively. For example, if a different sensor size is needed or a subject is no longer part of a study. Further information about these settings can be found here.
Registration of the c-med° alpha and the Gateway:

- Select PEOPLE in the menu bar and either register the sensors and Gateways for a newly created or an already existing person.
- For the registration of both the c-med° alpha and the Gateway, the six-digit serial number is entered in the field provided. The serial number consists of the last six digits of the UDI, which is located on the white label of the packaging and on the charging box. Further explanations regarding the labeling definitions can be found here and earlier on this page.
- If the serial number is entered correctly, the system will automatically recognize the number, delete it in the input field and list it down below as a sensor or a Gateway that has already been registered.
- Please, make sure that both the c-med° alpha sensor and the Gateway have been registered.
In order to record data, you need to add at least one receiving device (Gateway) and one sensor device (c-med° alpha). Please assign one person to one sensor to one gateway at a time for the most reliable data acquisition and transfer to the server.
8. View vital signs data
In order to see the vital signs data inside cosinuss° Health make sure that:
- The registered Gateway is connected with the registered sensor, which is inserted firmly inside the ear canal.
- Only if the sensor is inside your ear, you can start a measurement.
- A pseudonym for a patient needs to be assigned with both sensor and Gateway.
- After this is done, go to DASH in the menu bar and the vital signs data should be visualized shortly after.
The vital signs data is available for each pseudonym (so for each registered person). By default, you see the results of your last three minutes measurement. A detailed explanation of display options and further settings of the data view is available here.

| Numeric legend | Displayed information |
|---|---|
| 1 | Patient pseudonym |
| 2 | Serial number of sensor |
| 3 | Battery level |
| 4 | Time of the last measurement |
| 5 | Deviation score |
| 6 | Vital signs parameters |
| 7 | Quality indicators |
The current standard configuration of the cosinuss° Health Platform is to start measurement of 3 minutes duration every 15 minutes. After the measurement is completed, the respective values shown above are calculated and shown on the Dash. A detailed description of each parameter can be found here and the method behind the Deviation Score calculation here.
! Due to the currently used standard configuration of the cosinuss° Health Platform, it might take a few minutes until values will be visible on the Dash.
- The duration of the measurement can be changed with the “Trigger it” button in the top-right corner of the dash view after a pseudonym has been selected. In the field, you enter the required duration of the next measurement in seconds and click Go. Thereby, a measurement can be started manually with your selected duration.
- When new measurement configurations are applied, the Gateway will start recording with this new configuration. After the recording is finished, the data will be sent to the server. Therefore, it may take a few minutes before data can be observed on the dashboard.
For the most accurate data measurement, ensure that there is as little body movement as possible during the measurement. In particular, talking and chewing can significantly distort the measurements. Also, incorrect placement of the sensor inside the ear canal and disturbed data transmission between Gateway and sensor can result in inaccurate measurements. So, please make sure that the sensor is inserted as described and a stable connection between the sensor and the Gateway is provided. In addition, the quality score of the measured data indicates if the acquired data is reliable (qs>=40) or not (qs<40).
Troubleshooting
Note: Establishing the connection to start the measurement may take a few minutes. If a problem occurs with your c-med° alpha, please follow this troubleshooting information first. If this does not solve the problem, please contact cosinuss° customer service. See chapter: Customer service.
Switching on and off, charging
| Problem | Indicator | Reason | Solution |
|---|---|---|---|
| The c-med° alpha does not switch ON. | Status LED does not turn ON. | Battery is empty. | Charge in-ear sensor. |
| The c-med° alpha does not turn OFF. | Status LED does not turn OFF. | The sensor is not correctly positioned in the charging box. | Position sensor with good contact of the charging pins. |
| The c-med° alpha is not charging. | Charging LED does not turn ON. | The sensor is not correctly positioned in the charging box. | Position sensor with good contact of the charging pins. |
Connection and transmission
| Problem | Indicator | Reason | Solution |
|---|---|---|---|
| The c-med° alpha does not connect to the app. | The sensor stays in advertising mode. Status LED blinks blue. | The Bluetooth function of the smartphone is turned OFF. | Turn ON Bluetooth on the smartphone and retry. |
| The Bluetooth connection is interrupted repeatedly. | The status bar in the monitoring screen shows varying Bluetooth states. | See chapter: Warnings and precautions >Bluetooth | See chapter:Warnings and precautions >Bluetooth |
| The serial number is wrong. | Error message. | Typing error. | Correct typing error and try again. |
| The serial number is not recognized. | Error message. | The smartphone has no network connection. | Establish network connection and retry. |
| The serial number is not valid. | Error message. | No match on server. | Contact customer support. See chapter: Customer support |
Vital signs display
| Problem | Indicator | Reason | Solution |
|---|---|---|---|
| No vital signs are displayed. | The value shows no value (–.-) | No in-ear sensor connected. | Connect your sensor. |
| No in-ear sensor in Bluetooth range. | See chapter:Warnings and precautions >Bluetooth | ||
| No new values incoming since 30 seconds. | Check Bluetooth connection. |
||
| Measured values are out of range. | See chapter: Product specifications |
||
| Vital signs are marked invalid. | Question mark in vital signs card. | Quality index and/or Perfusion index are low. | Minimize influencing factors. See chapter: Warnings and precautions |
Wearing comfort
| Problem | Indicator | Reason | Solution |
|---|---|---|---|
| The in-ear sensor hurts. | Individual perception. | Wrong fitting. | Check the correct fitting of the in-ear sensor. See chapter: Apply the in-ear sensor to the ear |
| Wrong in-ear sensor size. | Check the long term behavior of the quality indices. |
||
| Exceeded wearing time. More than 12 hours without interruption. | Cancel the measurement. See chapter: Warnings and precautions |
||
| Sensor mechanically broken. | Cancel the measurement. See chapter: Warnings and precautions |
||
| The monitored person’s ear is injured. | Cancel the measurement. See chapter: Warnings and precautions |
Gateway status LED color
| Status LED | Meaning | Reason | Solution |
|---|---|---|---|
| Green (light) | Measurement paused. Gateway ready. | Everything’s fine. Sensor within range. No measurement/no upload/no update is taking place. | Everything’s fine. Wait for the next measuring interval. |
| Green (flashing) | Measurement is running. Signal quality is good. Do not unplug the Gateway! | Everything’s fine. | Everything’s fine. |
| Orange (flashing) | Measurement is running. Signal quality is poor. | Incorrect fit of the sensor or a distortion caused by movement during the measurement. | Make sure that you do not move during the measurement. If the orange LED still appears, check and adjust the fit of the sensor. Guide the tip of the sensor deeper into the ear. Check to retain ear hook. Adjust sensor neck. |
| Red (light) | No signal from the assigned sensor for 2 minutes. | Sensor is outside the Bluetooth range or its battery is depleted. | Return to the Bluetooth wireless radius of about 10 meters or charge the sensor battery. |
| Red (flashing) | Sensor is almost empty. | Sensor battery at 5% or less (Display only when no measurement is taking place). | Charge the sensor. |
| Blue (flashing) | Do not unplug the Gateway or UMTS stick! | Ongoing update. | Everything's fine. Very long flashing (several minutes) may indicate a poor Internet connection. |
| Blue-green (alternating) | Do not unplug the Gateway or UMTS stick! | Ongoing data upload to the server. | Everything's fine. Very long flashing (several minutes) may indicate a poor Internet connection. |
| Blue-red (alternating) | Measurement cannot be started. | No sensor is assigned to the Gateway in your cosinuss° Health acoount, the Gateway is not registered, or the Gateway has no connection with the server, e.g., due to insufficient cellular network coverage or a defective LAN cable. | Check whether the Gateway is registered in your cosinuss° Health account and if a sensor is assigned to it, or check the Internet connection of the Gateway. (If an Internet stick is used, consult the table below for more information; if a LAN cable is used, check that the cable is working properly.) |
Restart the Gateway
If no troubleshooting is successful, the system requires a RESTART. Do this by plugging the Gateway OFF and back ON to the socket. Try to avoid restarts, if the status LED is blue.
Modem Stick status LED color (Huawei Stick)
| Color | Behavior | Definition |
|---|---|---|
| GREEN | flashes 2x every 2 sec. | The USB Modem stick is switched on. |
| GREEN | flashes 1x every 2 sec. | The USB Modem stick is registered in a 2G network. |
| BLUE | flashes 1x every 2 sec. | The USB Modem stick is registered in a 3G/3G+ network. |
| GREEN | lights up permanently | A data connection to a 2G network is active. |
| BLUE | lights up permanently | A data connection with a 3G network is active. |
| CYAN | lights up permanently | A data connection with a 3G+ network is active. |
| - | LED turned OFF | The USB modem stick is disconnected or is not supplied with power. |
Modem Stick status LED color (ZTE Stick)
| Color | Behavior | Definition |
|---|---|---|
| RED | solid | The USB Modem stick is switched on. |
| GREEN | blinking | Register and connect to 2G/3G |
| GREEN | solid | A data connection with a 2G/3G network is active. |
| BLUE | blinking | Register and connect to 4G |
| BLUE | solid | A data connection with a 4G network is active. |
| - | LED turned OFF | The USB modem stick is disconnected or is not supplied with power. |
c-med° alpha status LED color
Status LED
| LED behavior | Description |
|---|---|
| Blinking blue (a short blink every 2.5 seconds) | Advertising. The in-ear sensor is broadcasting data to available receiving devices and is ready to establish a connection. |
| Blinking green (a short blink every 2.5 seconds) | Connected. The in-ear sensor is working properly. |
| Blinking red (a short blink every 2.5 seconds) | Connected. The in-ear sensor is working properly, but the battery is low. |
| Solid red (only applicable when the sensor is placed in the ear) | Connected. But the in-ear sensor is probably damaged, due to improperly working sensors and circuits. |
| LED is OFF | In-ear sensor is turned OFF. In-ear sensor is positioned correctly in the charging box. |
Charging LED
| LED behavior | Description |
|---|---|
| Solid red | In-ear sensor is charging. |
| LED is OFF | In-ear sensor is fully charged. |
Cleaning Instructions
Care
Take good care of your c-med° alpha to ensure long-lasting performance. The sensor head and the sensor lens are the most sensitive parts of the c-med° alpha. They should always be clean and faultless to ensure accurate monitoring. Store and charge your in-ear sensor only within the c-med° alpha charging box. If the sensor head or sensor lens is damaged, please contact customer service. See chapter: Customer service.
Cleaning
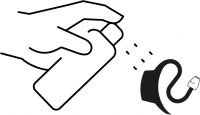
Before and after each use clean the in-ear sensor as shown in the following instructions. For disinfection and cleaning Cosinuss GmbH recommends the use of ‘Schülke mikrozid® AF liquid’ as an alcohol-based cleaning agent. Alternatively, any other disinfectant with the following composition can be used: 35% (w/w) 1-propanol, 25% (w/w) ethanol, no fragrances, undiluted application.
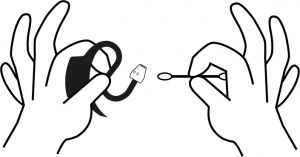
- Hold the sensor by the neck during cleaning, to avoid too much rotational movement.
- With a cotton swab soaked in disinfectant clean the sensor head and the inside of the sensor head.
- Spread disinfectant evenly over the entire sensor with a disposable cloth or a spray bottle.
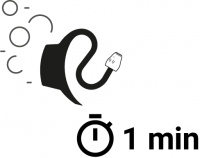
- Allow the disinfectant to take effect for at least 1 minute.
- Wipe completely dry with a disposable cloth.
- The sensor is now ready for use again.