cosinuss° LabClient
Description
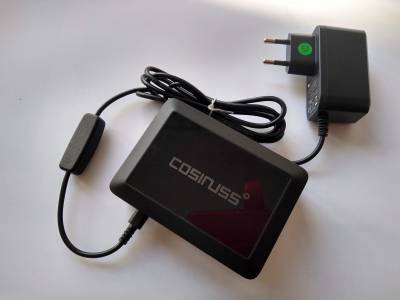
The cosinuss° LabClient is a mobile computer developed for receiving, processing and displaying the vital parameters of one or more cosinuss° sensors. The cosinuss° LabClient processes all data independently at local level and is accessible via its internal network. The sensors are directly connected to the client using Bluetooth Low Energy.
Delivery Scope
The delivery scope of the LabClient includes:
- LabClient
- Power Supply
cosinuss° sensors are not included in the delivery scope. They need to be purchased separately.
The LabClient Interface
The LabClient is accessible using a browser interface. All recordings can be managed via PC, tablet or smartphone. The user can observe these data live at different terminals and later on read and manage them collectively.
TABS:
- DATA: List view of all recorded data sessions on your LabClient.
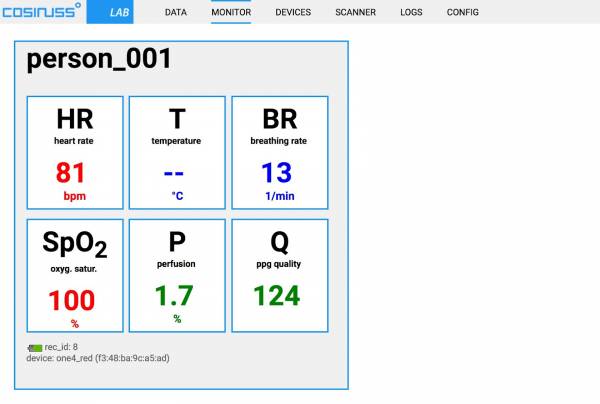
- MONITOR: Live view of all vital signs monitored.
- DEVICES: List view of all devices that were connected with your LabClient
- SCANNER: List view of all Bluetooth devices available in your area.
- LOGS: Log File of the Bluetooth connection and the Web interface.
- CONFIG: System configuration options.
Connect to the LabClient
Create a Wireless Access Point
Create a direct connection between your terminal device and the LabClient using a Wireless Access Point. The LabClient will be the host of its own wireless network.
Using this hermetic solution will make your terminal device run offline. Therefore there is no need for any approvals or releases from your IT administration, because all data will be streamed on a private network and stored locally onto the LabClient.
- Plug in your LabClient device with the provided power supply.
- The Power LED (red) of the LabClient turns on.
- Check the available networks in your area on your computer.
- Find the LabClient’s network, which is named after its Service Set Identifier (SSID). See the information label on the back of the LabClient.
- Connect with this Network by entering the password. See the information label on the back of the LabClient.
- Open your internet browser on your terminal device.
- Address the LabClient’s web interface by typing: http://hostname in the Address bar of your web browser. Alternatively you can enter the IP address directly: 192.168.101.1 See the information label on the back of the LabClient.
- You are now redirected to the LabClient’s web interface.
Please note: If you are connected to a LabClient being an Access Point this will replace your obligatory WLAN connection. If you want to be online while using a LabClient please use a LAN or Client connection. See next steps.
Connect to your Local Area Network (LAN)
Set up an Ethernet network between your terminal device, your router and the LabClient using a wired Local Area Network (LAN). This solution will integrate the LabClient into your existing network and keeps you online while operating with it. You must connect the LabClient to your router or to your existing network using a patchcable. The connection between your terminal device and your router can be either wired or wireless. Nevertheless all components have to be in the exact same network.
Connecting the LabClient like this may generate to the need for approvals or releases from your IT administration because data from an ‘unknown source’ will be streamed over your network. The MAC address of the LabClient has to be approved for your network in order for your router to provide an IP address. Or a static IP has to be released for the LabClient. Please contact your IT-Administration for this type of tasks.
- Plug in your LabClient device with the provided power supply.
- The Power LED of the LabClient turns on (Red).
- Connect the LabClient directly to your network router using a LAN cable.
- Connect your terminal device to the same network as the LabClient either via LAN cable or wireless connection.
- Open your internet browser on your terminal device.
- Address the LabClient’s web interface by typing the provided IP address by your network in the Address bar of your web browser. Please contact your IT-Administration to help you with this step.
- You are now redirected to the LabClient’s web interface.
Connect to your Local Area Network (Wireless LAN)
Unleash the LabClient from the patchcable and position it anywhere within your wireless network. A wireless LabClient can be useful for a better positioning in the area where you want to monitor vitalsign with cosinuss° devices.
Follow the exact same steps as described before in ‘Connect to your Local Area Network (LAN) Then continue with:
- Select the ‘CONFIG’ tab.
- Look for the ‘LabClient Connection’ area.
- Select the Option: ‘Wireless LAN’.
- Scan for the WiFi Network and select your network
- Enter SSID and password for access to your existing local network.
- Save config to confirm these changes.
- Deplug the patchcable from your LabClient.
- You may deplug the LabCLient from it’s power source.
- Reposition the LabClient within the reach of your WLAN.
- turn on the LabClient again.
- Open your internet browser on your terminal device.
- Address the LabClient’s web interface by typing the provided IP address by your network in the Address bar of your web browser. Please contact your IT-Administration to help you with this step.
Record data
The instructions below can be applied to one or multiple cosinuss° devices.
Measuring preconditions
- Make sure your sensor devices are charged.
- Read the sensor Manual.
- Visit support for detailed descriptions: www.support.cosinuss.com
- Best case scenario: Label your sensor device with its Mac_ID for fast identification.
- LabClient and sensor must be placed within the Bluetooth LE range of approx 10 meters.
Start a recording
- Turn on one cosinuss° sensor.
- Go to the LabClient Web Interface and select the SCANNER tab.
- Look for your device name and/ or Mac_ID in the SCANNER List.
- Click on the ‘connect’ button in the ‘action’ column.
- Choose a Person ID to start the recording (only available if a Project is created on Cosinuss server by your request).
- Wait until the device established a recording.
- An active recording is now running.
- View the incoming vital signs in the view of the ‘MONITOR’ tab.
Please note: If the device is not instantly listed wait for one or two advertising circles, and ensure the device is charged. The state of connection in the ‘status’ column changes to ‘connecting…’. This process can take up to 2-3 minutes.
Stop a recording
- Go to the LabClient Web Interface and select the SCANNER tab.
- Look for your device name and/ or Mac_ID in the SCANNER List.
- Click on the ‘disconnect’ button in the ‘action’ column.
- An active recording is now stopped.
- The sensor is now disconnected from the LabClient.
View recorded data session
- Go to the LabClient Web Interface and select the ‘DATA’ tab.
- Look for your either:
→ Datetime of the recording
→ Person_ID
→ device name and/ or Mac_ID
- You can now choose between
→ Uploading the recorded data session to the server
→ Downloading the recorded data session as CSV
Upload recorded data
- Go to the LabClient Web Interface and select the ‘DATA’ tab.
- Choose the recorded data session you want to upload.
- Click on the ‘upload’ button in the ‘lab server’ column.
- The recorded session will be uploaded to the cosinuss° server.
Please note: This data is then only accessible if you and cosinuss° agreed upon beforehand.
Download recorded data
- Go to the LabClient Web Interface and select the ‘DATA’ tab.
- Choose the recorded data session you want to download.
- Click on the download button in the ‘csv’ column.
- The recorded session will be downloaded to your local folder
- The file will be a CSV format and named after Record_ID by default.
Restart the LabClient
- Go to the ‘CONFIG’ tab.
- Scroll down to the ‘LabClient system’ section.
- Click on ‘restart’.
- Confirm with ‘OK’.
- The LabClient restarts.
- You will be redirected to the ‘CONFIG’ tab.
Please note: This process will take approx. 30 seconds.
Update the LabClient version
- Go to the ‘CONFIG’ tab
- Scroll down to the ‘LabClient status’ section
- Click on ‘check for updates’
- You will see the notification 'update available: *newest version* '
- Clicking on the 'Update Now' button and start the update
Please note: Ensure the LabClient has access to the internet. This process may take up to 1-2 minutes.
Troubleshooting
No Bluetooth connection can be established. Ensure that the LabClient and the devices are in Bluetooth LE range of approx. 10 meters
- Go to the ‘CONFIG’ tab.
- Scroll down to the ‘LabClient system’ section.
- Click on the ‘reset Bluetooth’ Button.
- Confirm the process with clicking ‘OK’.
- Wait for the process to be completed
- You will be redirected to the ‘CONFIG’ tab.
- Start over with your desired action.
The LabClient system does not react in any way as expected. Ensure you meet all preconditions of your process.
- Go to the ‘CONFIG’ tab.
- Scroll down to the ‘LabClient system’ section.
- Click on the ‘restart’ Button.
- Confirm the process with clicking ‘OK'.
- Wait for the process to be completed.
- You will be redirected to the ‘CONFIG’ tab.
- Start over with your desired action.
The ‘CONFIG’ tab
Wifi Mode
Access Point: Set by default. The LabClient acts as a WIFI host Client: Integrate LabClient into existing WIFI Network Enter SSID and Key of your existing WIFI host
Internet Connection
Shows the status of your internet connection.
Bluetooth
Time to reconnect: Sets the time the LabClient tries to reconnect with once disconnected devices. After the time is expired the LabCLient will not automatically try to reconnect with lost devices.
Data Handling
Set up if you want to store RAW Data, Yes or NO. RAW data includes PPG and Acceleration.
Lab Server transfer
Set the uploading mode.
Automatic connection
Set predefined options for automated recordings Filtered by either MAC address or device name.
Please confirm changes always with hitting ‘save config’.
REST API Integration
Request the cosinuss° data as JSON document.
- Api_Key: For your personal key please contact your cosinuss° account manager.
- Device_ID: See the ‘DEVICES’ tab in the main menu for Device_ID of connected device.
- Value_request: There are two ways to request the vital signs and signal quality data:
→ last_value: Returns the very last values of the device ID.
→ history_values: Returns all history values of the device ID.
- Time : Add time in seconds to filter values beginning at a certain startpoint. Only possible for history_value requests.

